Before I create a proposal, I always start by getting to know my potential client. I ask them a few specific questions to determine if we will work well together and if I’m the right person for the job. If I’m really excited about the project then I know it will be a great fit! My next step is to send them my media kit with more information about my design process and pricing. This is also a good time to jump on the phone or connect via Skype to ensure that we are both clear on all of the details before I create the proposal. This is the final step in the process before a contract is signed and work begins. It helps to have all of the details ironed out before you begin working on it.

When I first started my business, I set up an Indesign file with a proposal template that I customize for each individual client. It’s definitely not the fastest method, but I choose to do it this way to keep all of my branding consistent. From my media kit to my proposal everything is branded and has a similar look and feel. Although there are some great apps that do this, I find this method works best for me. If you are looking to streamline your process a little bit more, I highly recommend looking into 17 Hats, Honeybook or Pancake.
Now onto what a proposal actually does! The proposal will break down exactly what is offered, how much it costs and what the timeline will be. It’s as simple as that. I use the first page of my proposal as a project introduction and overview. Typically, including a brief explanation of my clients business and what I will be doing for them. I discuss my studio; give a brief description of my experience level and myself. I always make it crystal clear what return the client will see on their investment. It’s important to keep the tone of this paragraph professional but approachable. That way, I can convey that I’m really passionate about what I do and give a little insight into what it will be like to work with me. This is also a great time to mention your core message and what makes you stand out from all of the other designers out there!
I like to finish this section up by stating what the goal of the project is. The goal might be to increase online sales by creating a more user-friendly website. Or, maybe it’s creating a brand identity that speaks to their target market and expresses the values of their company. Whatever it might be, I always make sure to include a measurable goal that, both the client and I can refer back to once the project begins.
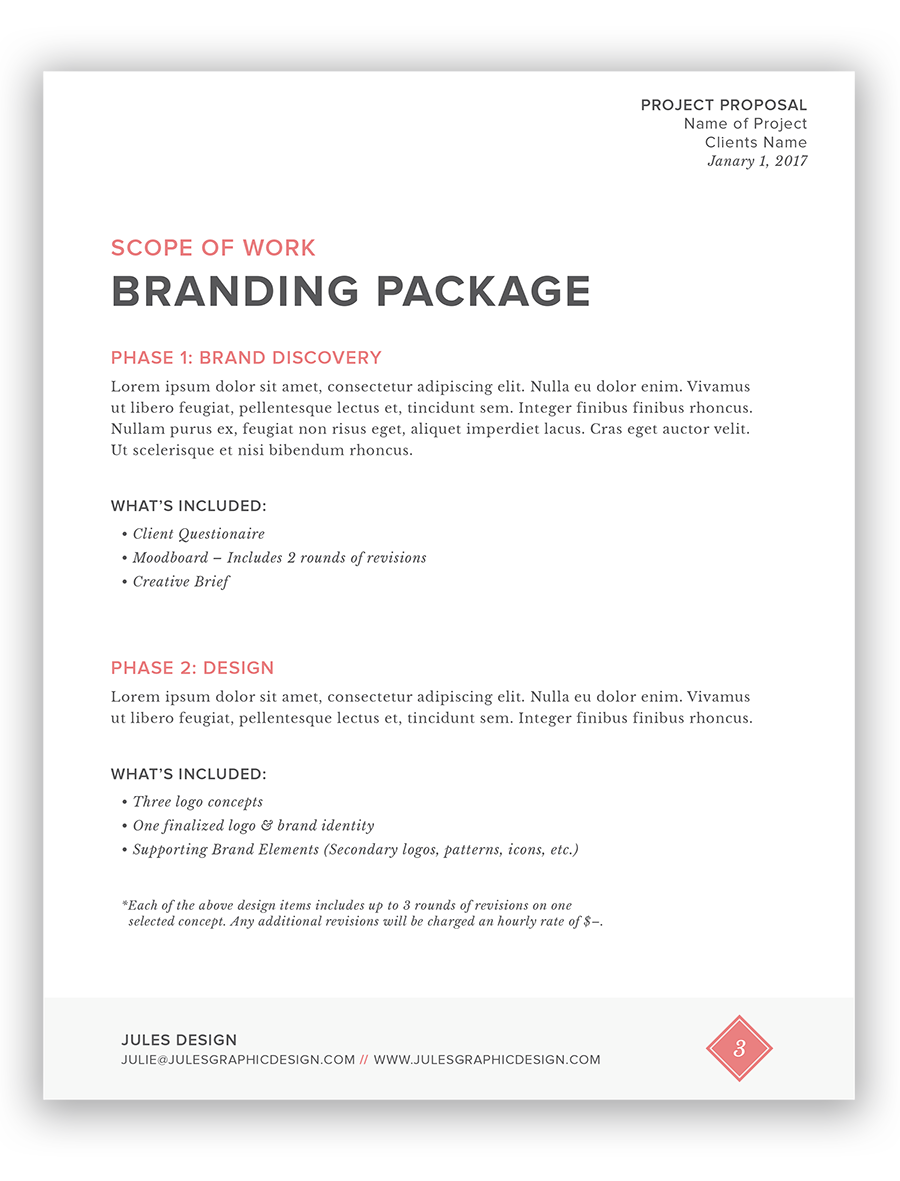
This section is followed by the scope of work, which is a detailed list of the deliverables. I like to break the deliverables down into phases. For branding, I have three phases that I include in each project – Brand Discovery, Design & Production. I add a sentence or two about what to expect during each part of the process and then break down exactly what is included in a bulleted list. A detailed, yet concise list will really make certain that you and your client are both on the same page when moving through the different phases of your project. It also ensures, early on, that your client understands what will be expected from both of you during the process. I think this section is really the most important because it breaks down what the deliverables will be. So, I included a page right from my Branding proposal template:

The final page in my proposal is the project timeline & pricing. I keep this page really simple and to-the-point by listing out the three phases with a timeline underneath. Instead of writing a specific due date for each of the three phases above, I prefer to write deadlines such as “1 week” or “1 month”. I choose to do this because I understand that, life happens! Believe me, once a project begins I work hard to keep it on track. I have a whole project management system, set up in Asana, to keep things running smoothly. But, things can still come up! The timeline is subject to change because it is based on the client providing prompt feedback. If feedback is delayed for any reason, or I cannot get in touch, the timeline will need to be adjusted appropriately. Lastly, I list out the pricing for each phase in the scope of work and then total up the price at the bottom of the page. Just in case, I also make a note about what my hourly rate is. This way, if the project runs over my client already has this pricing information.
Creating a professional design proposal is helpful for both parties involved. It ensures that you’re all on the same page before any contracts are signed or projects begin. It establishes you as a professional and will put your client at ease knowing exactly what each deliverable is and when they will be getting it.
Proposals aren’t scary at all and are simple to manage once you get the hang of them! If you haven’t already incorporated a proposal into your freelance business then I definitely recommend adding it to your onboarding process. Feel free to use the Scope of Work page above as a guide to what should be included. I hope it inspires you to create a template for yourself!
You only get one homepage. Let’s make it work harder. Get a free expert review of your homepage, so it actually attracts your dream clients!
Free Homepage Health Check
Copyright 2022 - All Rights Reserved | Website made by Jules Design (of course!)
Terms & Conditions
Privacy Policy
We are a Richmond Virginia based website design and brand identity design studio for dietitians, nutritionists, health coaches, fitness professionals and wellness entrepreneurs. We love working with brands with compassion in the health space.
