Adobe Illustrator is my go-to program for creating vector graphics. I’ve been working with this program for about 7 years now and am still constantly learning new things. The possibilities are pretty endless! It’s such a powerful design tool and I don’t know where I would be without it.
Today, I’m going to be sharing some Illustrator tips and a few of my favorite shortcuts that were all pretty life changing when I first learned about them. As a bonus, I included a PDF of my favorite shortcuts that you can download and keep handy whenever you are working in Illustrator. This list includes 35 shortcuts that will save you a ton of time, especially, if you are new to the program. Even if you have been using Illustrator for a number of years, you might learn a thing or two.

5 Tips & Tricks
Saving Swatches
When I’m designing a new brand identity, I create a custom color palette in Illustrator that I can reference for all other client work. This really comes in handy once I start creating print pieces for the brand, because I can load all of my colors before I even begin designing.
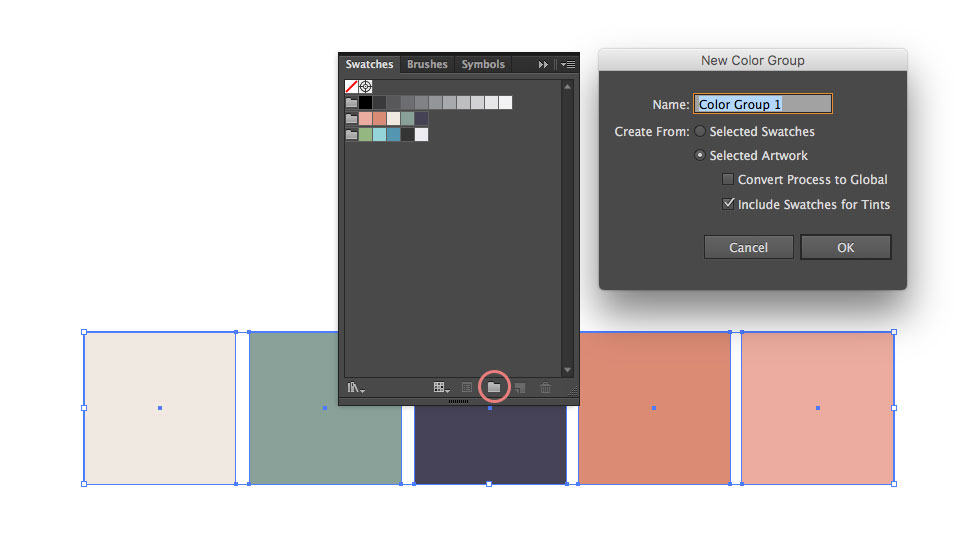
The simplest way to do this is to create little-filled squares and then select them all. Go to the Swatches menu and click the New Color Group icon (looks like a folder) and then choose from selected artwork. Now you will have a color group that you can use for future design projects. See the diagram below for a breakdown of how to do this.

Transform Patterns
Say you want to scale the size of a pattern in Illustrator to be either smaller or larger than the original design. Simply go to, Object > Transform > Scale or right click on the selected pattern and go to Transform > Scale. You will want to make sure that you deselect Transform Objects and then you can reduce the percentage to a smaller size in the Uniform Scale section. Now, you can easily adjust the size without distorting your object or needing to create a new/smaller pattern.
You can also go to Transform > Move to move the pattern around to display the desired part of the graphic in your object.
Select Same Color/Stroke
This is a huge time saver and is actually something that I didn’t know about for the first few years that I was using the program. I would go around individually selecting each color that I wanted to change, which wasted a ton of time! If you want to change all of the colors, stroke weights, or anything really simply go to Select > Same > Choose whichever option you want. In this case, I would choose to fill color and then change all of the colors at once to another shade.
Pathfinder Tool
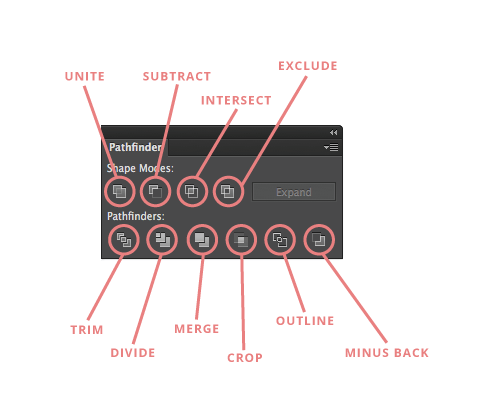
The pathfinder tool is one of the most important things to master when creating vector graphics. Whenever I’m turning a sketch into digital art, I rely on a combination of the Pathfinder & pen tools to get the job done. If you aren’t familiar with how to use the Pathfinder tool, then check out this video by technology guru for more information. The video breaks everything down in a really simple way. Or, take a look at the diagram below for a little refresher on what all of the various buttons do to merge and cut shapes. This tool can take a little getting used to, but its well worth it.

Copy Formatting/Colors with Eyedropper
I use the eyedropper tool in Illustrator constantly! For instance, it’s faster to select a color from another object on the page than to go up to the swatches panel and select it. I will select the color I want to change and then use the eyedropper tool to sample a color from another place on the artboard. Another great way to use this tool is on type. You can mimic already existing type elsewhere on the page to ensure that the font, size, kerning, and leading are all instantly the same.
5 Keyboard Shortcuts
The Spacebar
Pressing the spacebar will transition you from the selection to the hand tool. Once you stop holding the spacebar, you will toggle back to the selection tool. I’m constantly switching between these two devices in Illustrator so using this shortcut saves me a ton of time.
Command or Control + D
Using this shortcut will repeat the last action that you made in Illustrator. This is especially helpful when creating repeating patterns. Simply create one object, copy it, and move it to the next location. Then hit Command/Control + D to copy the exact same spacing over and over again – creating a repeating pattern in just a few minutes.
Pen Tool Shortcuts
The pen is one of the most powerful tools in Adobe Illustrator. Learning these simple shortcuts will save you a ton of time and streamline your workflow for years to come. This is one of the first shortcuts that I learned when starting out in Adobe Illustrator, and I’m so glad that I did. Toggling between these 4 tools will become something that you find yourself doing quite often, especially if you’re designing from sketched artwork.
P: Pen Tool
+: Add Anchor Point Tool
-: Subtract Anchor Point Tool
Shift + C: Convert Anchor Point Tool
Paste in Front & Back
Here’s another simple shortcut that will save you a ton of time! Hit Command/Control + C to copy and then Command/Control + F to paste in front of the selected object, or Command/Control + B to paste in the back of an object. This will allow you to paste objects in place and in the order that you would like them to appear in the layers panel.
Decrease/Increase Type Size
Select your text and hold down Command/Control + Shift, then use the left and right arrows on your keyboard to adjust the size of the type. This is such a time saver and allows you to customize your typography without needing to open the Character/Paragraph window. Check out the Adobe Illustrator PDF to learn more helpful character shortcuts!
Watch the Simplify to Sell Website Workshop
I’ll show you how to streamline, connect with your niche, and earn more money from your website during this free on-demand website workshop for health and wellness professionals.
You only get one homepage. Let’s make it work harder. Get a free expert review of your homepage, so it actually attracts your dream clients!
Free Homepage Health Check
Copyright 2022 - All Rights Reserved | Website made by Jules Design (of course!)
Terms & Conditions
Privacy Policy
Jules Design is a Richmond, Virginia–based private practice website design and brand studio serving dietitians, therapists, nutritionists, and healthcare professionals. We create strategic, client-attracting websites for evidence-based clinicians who want a polished and professional online presence.
